If you own a pet that has a problem with fleas, a common suggestion is to dip them into a solution that will kill these little blood-sucking pests on contact. In this guide, I will explore the safety, effectiveness, the price tag, and how to do it yourself (without chemical ingredients). As usual, if you have any questions, let me know in the comments.
- What is a flea dip, how does it work and is it really that effective for fleas?
- Is it completely safe for your dogs and cats, or are there any dangers?
- How much does it usually cost for someone else to do the flea dip for you?
- (DIY) How to give your cat a flea dip using natural and safe ingredients?
- (DIY) What is the best way to dip your dog to get rid of those pesky fleas?
What are flea dips, how do they work and are they effective?
Farmers have been dipping animals to kill of insects or parasites since the 1830’s, and although the products we use nowadays are different, the process is very similar. You simply submerge the animal (in this case, your dog or cat) into a water bath that mixed with a flea killing solution (up to the head) and if it is done properly, your pet will be flea free a couple minutes later.
In the past, dangerous chemicals were used, resulting in damage to surrounding vegetation and water pollution. Even worse, some of the chemicals used created neurological conditions in animals referred to as “O.P” (organophosphates) poisoning. Today, the most commonly used dip contains Pyrethrins, a “natural” product made from chrysanthemum flowers, but research has shown that it is not without risks to pets and humans.
There is no doubt about the effectiveness of dipping your pet. When faced with an explosion of fleas when hot, humid conditions occur, many pet owners have found that using a dip bath is a great option to get rid of fleas on their cats and dogs, and I have used it in the past with very good results (using natural ingredients, more on this a little later in the article).
However, it is important to remember that a flea dip bath is just your first line of defense. Whatever product you have chosen to use, the purpose should be to get rid of the fleas present on your pet’s body. You will need to follow up with preventative measures to ensure that your dog or cat does not become re-infected, and it’s imperative that you treat your environment thoroughly. For more information about treating your home, check out my article on using salt or baking soda for flea control.
Is dipping your pets for fleas safe, or are there dangers?
Most commercial flea dips that I have seen recommend the use of gloves during application. Although this doesn’t mean that they pose any major health concerns, it must be said that some ingredients can place a load on your pet’s immune system. I highly recommend that you look for a product that avoids as many chemicals as possible, or just make your own.
Please remember that cats must never be dipped with anything containing pyrethroid, as the risk of fatal poisoning is too high. Also, don’t dip puppies under the age of four months or pregnant or lactating dogs to avoid potential side effects.
Keeping in mind the above, I am happy to say that most commercial flea dips are safe for dogs and cats, provided you use a reputable brand and the correct dosages are used for your pet.
The good news is that you don’t need chemicals at all. It is possible to give both your canine and feline an effective and safe flea bath using all natural products, and they will be equally safe for you (no gloves lol).
How much does it usually cost to get this done for you?
One word to describe life nowadays – HECTIC! If this sounds like your life, please don’t feel bad about getting some help, or even using a commercial flea product on dog or cat. In the end, you want to help your pet, and that is to be commended.
If you do decide to get someone to assist, the costs usually differ based on the size of your pet. I have done the research for you, and it looks like that it will cost around $20 – $35 for a medium-sized dog or cat. There were a couple places that were very expensive though, so I recommend that you get a couple quotes before choosing one in your local area.
Quite honestly though, even if you manage to find a place that is willing to do it at a very affordable price (and not use any harmful chemicals), I recommend doing it yourself with my homemade recipe. It will only take about 20 minutes, it works immediately and you will have full control over all the ingredients.
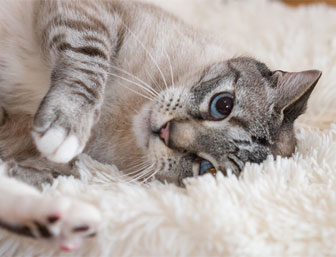
How to do a flea dip for cats in five easy steps (DIY)
It is possible to give even a somewhat reluctant kitty a bath if you are well prepared and have a few tricks up your sleeve. The vital part about dipping your cat is that you should do it quickly so that neither you nor precious feline gets freaked out. I have found that clipping his or her nails a couple days before “dip day” and wearing an old long sleeve jacket can really help as well.
Step 2: Prepare the place where you would like to dip your kitty. Use a plastic container big enough for your cat, with enough space around him that will allow you to scoop up your prepared liquid to pour gently over him. Have towels ready, your solution mixed – I repeat – you won’t be able to get something you’ve forgotten in the middle of dip time!
Step 3: Place your into a dry bath with only his back feet touching the bottom of the container. Hold his front legs together in one hand, supporting his body up in this position and pour your mixture over your cat from his neck down. Keep scooping up the liquid, covering his body thoroughly for as long as he remains calm.
Step 4: At this stage, some of the fleas might have scurried upwards onto your kitty’s face. Don’t pour the dip mixture over his face, use a small sponge or cloth to carefully apply some of the liquid, getting to the last of those little critters. Avoid getting any solution into your cat’s eyes or ears.
Step 5: Pick your kitty up out of the bath, using a big towel and wrap him up in it. I usually give my cat a little treat at this point but yours might just want to get away as soon as possible (which is fine). Let him air dry so that the dipping liquid can remain on his coat for a little while.
Now that you know the process for giving your cat a dip, let’s look at a couple natural products that are 100% non-toxic and very effective at killing fleas. Please don’t disregard these non-chemical options, I have personally tired them and they worked for me time and time again. If you want to find other essential oil recipes for fighting fleas, please check out this article.
Dawn dish soap kills fleas on contact and doesn’t contain any harsh or toxic chemicals. This is my personal favorite, and it is a very affordable option. If this brand is not available in your country, try to find a gentle dish soap replacement. The application process is exactly the same as the one mentioned above but if you want to learn more, click here to read my full article on it.
Lemon and eucalyptus can be used to kill fleas as well. Place 6 cups of cold water into a pot and slice three lemons into it. Once water is boiling, add four drops of eucalyptus essential oil, and leave for a further five minutes. Leave the mixture to cool until it reaches room temperature. Use while still lukewarm to pour over your flea tormented kitty.
Apple cider vinegar makes a great homemade flea dip. Not only does apple cider vinegar repel fleas it also removes allergens from your pet’s skin, as well as fungal producing yeast that can plague some pets. Simply add 1 cup of apple cider vinegar to 68oz (2L) of lukewarm water into your jug. Make sure that the water is cooled before using it on your furry friend.
Steps for doing a flea dip for dogs (DIY)
Unlike our fussy felines, most dogs thoroughly enjoy being pampered with a lovely bath. What is also great about making homemade dips for dogs is that you have a much wider range of products that are safe for canine use. Although the process is fairly similar to the above, here is the steps that I recommend you follow for your pooch.
 Step 1: I usually use a regular sized bath for dipping my dog, but feel free to use the shower, or perhaps a large container. Fill it with warm water and add your flea killing product (more on this below) to it. If you are using a shower, keep a separate bucket with the solution inside of it and have a cup handy for scooping it onto your dog.
Step 2: Once your dog is standing in it, lather the flea dip solution into his fur, making sure that you get down to the skin. Try to avoid the eyes as depending on what you are using, it could irritate them. Instead, get a small cloth to do your dogs face instead of pouring the solution on it. Trust me, your dog will be thankful.
Step 3: Rinse everything off and dry your doggy with a large towel. I usually just spot dry and then let him run around outside for a little bit if the weather is good. If you don’t have a yard, then just spend a bit more time making sure that your dog is mostly dry. Even if you have a big dog, this won’t take too long (about 10 minutes).
In regards to the natural flea removal products that you can add to your flea dip, it is a lot easier with dogs than with cats. With that in mind however, I still recommend that you give Dawn a try as it is my preferred option (kills fleas really fast), but feel free to use any of the ones listed under the cats section. In addition, here are a couple more than also work very well for dog fleas:
Neem oil is not only a flea repelling oil – you will have the added benefit of having a pooch with a shiny coat and a healthy skin. To make it even better, add a couple drops or either orange or lemon essential oils to the mix, as it is great for deodorizing your pooches’ coat. This is important if the weather is overcast, as it will prevent that “wet dog” smell.
Peppermint oil is absolutely fantastic for keeping fleas away from your dog. I usually start off by using dawn, dry my pooch and then apply a fine “mist” of this essential oil. To do this, simply place a couple drops into a spray bottle (with cold water), mix it up and spray away. When fleas smell peppermint oil, they will try and get away as soon as possible.
How long does a commercial or homemade dip last for?
 A commercial dip works quickly to kill all fleas, flea eggs and larvae, but the chemicals are harsh on your pet’s skin and can pose potential dangers for your pet as we have already discussed. Commercial dips last about a week, and I recommend that you don’t repeat them more than three times a year.
The natural flea dips last a couple days (if you have included peppermint oil, it can be longer), but the beauty of these homemade treatments is that they can be repeated frequently. Although many resources state that natural dips take longer to get rid of these pests, I have to disagree with that. In my experience, combining various essential oils and Dawn not only kills fleas fast but keeps them away.
The only consideration is that commercial flea products usually contain an IGR (insect growth regulator), which will stop the flea life cycle. However, since you are free to bath more frequently, repeating the dip for a couple weeks solves this potential problem easily.
My final thoughts and conclusion
In conclusion, dips are an excellent solution for controlling fleas, and the good news is that some natural products can replace harsher alternatives. Just remember that if you have a cat, some essential oils are dangerous, so rather use the ones I recommended in this article.
Lastly, getting rid of the fleas on your pet is not the only thing that you need to do to beat a flea infestation. You need to pay attention to your house and yard as well, so please take a little time to review my articles that cover these areas under the “fleas” category (on this blog). Thank you for reading my article, I hope it has been of value to you. If you have any questions or suggestions, please let me know in the comment section.
Hello! My name is Natasha, and I have been helping people with their insect problems since 2012. I have published a book, worked with many pest control companies, and helped thousands with various infestations on a one-to-one basis. My goal for this blog is to create evidence-based guides that are easy to understand, provide sufficient depth and can be trusted to be very accurate. Please remember that my guides are for informational purposes only, and that you agree to the terms of use when reading content on this website. If you leave a comment, I typically respond within 48 hours.

Speak Your Mind